
Introduction
“To truly understand something, build with it.”
As I started exploring generative AI, I realized I needed a hands-on project to truly learn the fundamentals – something enjoyable, practical, and actually beneficial. That's when it hit me: why not create a chatbot for my own portfolio?
Imagine a portfolio that not only displays your work, but speaks for it.
In this blog, I’ll walk you through how I built this full-stack chatbot from scratch using:
- Amazon Bedrock’s LLaMA 3.3 with a Retrieval-Augmented Generation (RAG) setup
- Next.js App Router and Tailwind CSS for a smooth UI- Framer Motion for animated transitions
- Vercel for deployment- And a carefully structured knowledge base hosted on S3
Whether you're a student, a data engineer, or an AI enthusiast — this post will help you build your own AI chatbot for any website.
Project Overview
Here’s a quick breakdown of what the chatbot does:
- 💬 Interactive Q&A: Users can ask questions about my work, resume, or tech stack
- 🧠 RAG Retrieval: Fetches context from my knowledge base (PDFs, Markdown files, web crawl)
- 🤖 LLM Response: Uses Llama 3.3 on Bedrock to answer queries naturally🧭
- Suggested Questions: Shows helpful prompts when the user first enters the chat
- 🪄 Typing Indicator & Animations: Clean UI with Tailwind and Framer Motion
- 🔐 Rate Limiting: Prevents abuse & saves on AWS costs
- 📦 Portable: Can be plugged into any portfolio or personal site
Architecture
Before we dive into the code, here’s a high-level view of how everything works under the hood:
System Architecture Diagram
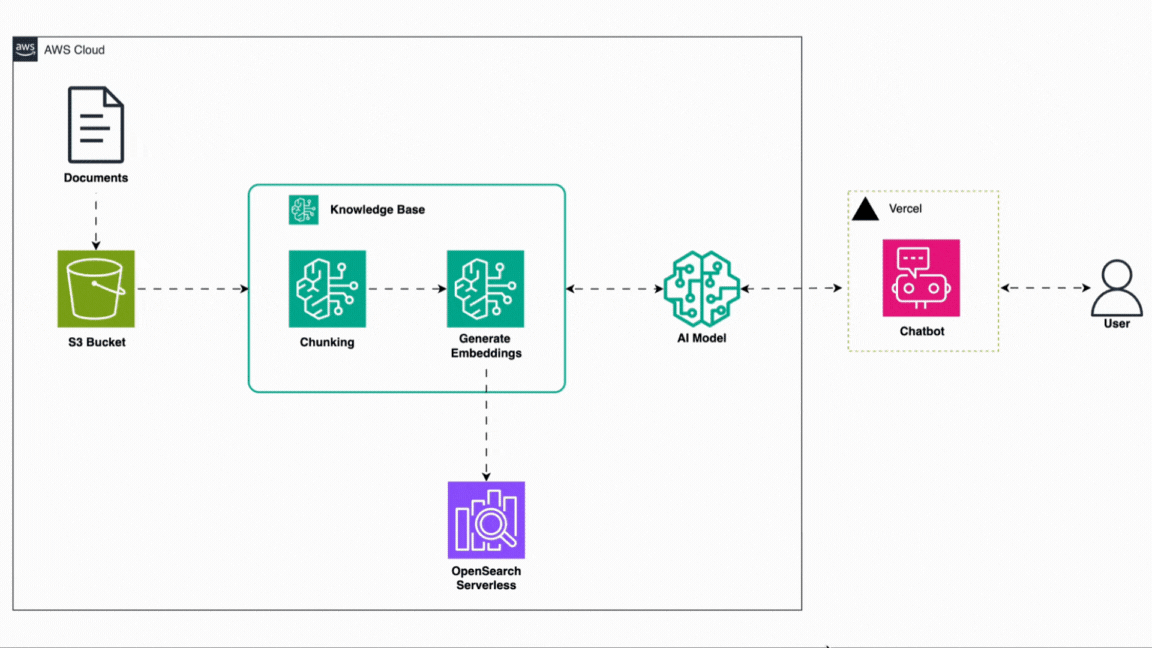
Breakdown
Here’s how each piece plays a role:
🧠 1. Knowledge Base (S3 + Bedrock Retrieval)
Your documents (resume, about-me, projects, etc.) are stored in an S3 bucket. When a user asks something, a RetrieveCommand is sent to Bedrock Agent Runtime, which finds relevant documents to use as context.
✍️ 2. Prompt Construction (RAG)
Your backend takes the user's question and retrieved context, and crafts a RAG-style prompt:
1export const promptText = (retrievedDocuments, userInput) => {
2 return `You are an intelligent portfolio assistant for YOUR_NAME, helping users learn about YOUR_NAME's background, experience, and projects.
3
4 Answer the following user question in a helpful, concise and structured response in professional tone. Avoid phrases like "based on the provided context." If helpful, mention specific skills, tools, or projects from the context. If the question is general (e.g., "Tell me about yourself"), summarize key highlights in a well-organized format.
5
6 When answering questions, use clean text. Do not include Markdown for images, links, or badges like ""
7
8 Always format the output using markdown-style elements like:
9 - bullet points
10 - bold headings
11 - numbered lists (if appropriate)
12 - short paragraphs for clarity
13
14 Strictly use only the context provided. Do not make up any information without any facts. If context is missing, say: "Sorry, I don't have enough information to answer that."
15
16 Context:
17 ${retrievedDocuments}
18
19 User Question:
20 ${userInput}
21
22 Response:This helps the LLM give focused, document-aware answers.
🤖 3. Model Inference via Bedrock
The final prompt is sent to Bedrock Runtime using the LLaMA 3.3 model. The model returns a clean, conversational reply.
🖥️ 4. Frontend + Chat UI
The response is then rendered in a chat-style UI using:
- Tailwind CSS for styling
- Framer Motion for smooth animations
- A persistent floating button
- Suggested questions + typing indicator
Rate Limiting & UX Enhancements
To prevent abuse or overuse (especially with a paid LLM), the API route is rate-limited using a lightweight middleware. This ensures you're protected from spam and stay within budget.
Setting Up Your Environment and Bedrock Knowledge Base
Before we write any code, we need to set up the foundation: a working knowledge base in Amazon Bedrock, connected to your own content hosted in S3, and backed by the LLaMA 3.3 model.
🧠 What is RAG?
RAG (Retrieval-Augmented Generation) is an AI pattern where an LLM doesn’t just rely on its pre-training — it augments its response by retrieving relevant information from your own documents or data sources.
This is perfect for making your AI chatbot answer questions based on you — your resume, your projects, your blog, etc.
Step 1: Create an S3 Bucket for Knowledge Documents
Create S3 and Upload files to knowledge base
- Log into your AWS Console.
- Go to S3 and create a bucket (e.g., portfolio-chatbot-kb).
- Upload files that you want your chatbot to learn from:
- resume.pdf
- about-me.md
- certifications.md
- faq.md
- projects/*.md
Step 2: Set Up a Knowledge Base in Amazon Bedrock
Create Bedrock Knowledge Base
- Navigate to Amazon Bedrock > Builder Tools > Knowledge Bases
- Click Create Knowledge Base - (portfolio-chatbot-kb) (desc - Knowledge Base for Portfolio Chatbot)
- Choose Vector Store as the data type - (s3-portfolio-chatbot-kb)
Unlike traditional keyword search, vector stores retrieve semantically similar information — even if it doesn’t exactly match the user’s input.
- Connect your S3 bucket as the data source.
Optional: Set up a crawler with URLs like:
- https://www.rahulsaini.click/
- https://github.com/RahulSaini02?tab=repositories
- https://www.linkedin.com/in/sainir02/
This way, Bedrock can index both static docs and live web pages as your knowledge base grows.
Step 3: Enable AI Models in Bedrock
Enable Models
Your chatbot will need two kinds of models:
- Embedding model – to vectorize your documents
- Text generation model – to generate intelligent human like responses
Go to Model access settings in Amazon Bedrock and enable:
- ✅ Titan Embeddings V2 – for document embeddings
- ✅ Meta LLaMA 3.3 70b – high-quality answers for production
💡 Note: LLaMA 3.3 (70b) is on-demand, giving much better results.
Step 4: Sync Your Knowledge Base
Sync Knowledge Base with Data Source
- Go to your Knowledge Base dashboard in Bedrock.
- Under Data Sources, select your S3 integration.
- Click Sync to ingest the latest content.
- On the right panel, use Select Model to choose:
- Foundation model: Meta LLaMA 3.3 70b
- Embedding model: Titan Embeddings V2
This creates a full retrieval-to-response pipeline using OpenSearch Serverless under the hood.
Step 5: Test the Chatbot
Chatbot Test
- Bedrock provides a test UI to validate your setup
Now that our Bedrock RAG setup is ready, we can move on to the actual backend API route in Next.js that connects this to your chatbot UI.
Building the Next.js API Route for Chatbot Queries
Our chatbot needs a secure, scalable backend that does three key things:
- Accepts user input (the question)
- Queries your Bedrock knowledge base to retrieve context
- Sends that context to LLaMA 3.3 to generate a smart response
We’ll build this using a route handler in app/api/query-bedrock/route.ts.
Before we start the build Install Required Packages (locally)
Make sure these are in your package.json:
1npm install @aws-sdk/client-bedrock-runtime \
2             @aws-sdk/client-bedrock-agent-runtime \
3             @aws-sdk/credential-provider-env \
4             framer-motion react-icons
File: app/api/query-bedrock/route.ts
1import { NextRequest, NextResponse } from "next/server";
2import { BedrockRuntimeClient, InvokeModelCommand } from "@aws-sdk/client-bedrock-runtime";
3import { BedrockAgentRuntimeClient, RetrieveCommand } from "@aws-sdk/client-bedrock-agent-runtime";
4import { fromEnv } from "@aws-sdk/credential-provider-env";
5import { buildPayloadForModel } from '../../../utils/buildPayloadForModel';
6
7const config = { region: process.env.AWS_REGION, credentials: fromEnv(), };
8const bedrockRuntimeClient = new BedrockRuntimeClient(config);
9const bedrockAgentRuntimeClient = new BedrockAgentRuntimeClient(config);
10const jsonContentType = "application/json";
11
12const KNOWLEDGE_BASE_ID = process.env.AWS_BEDROCK_KNOWLEDGE_BASE_ID!;
13const MODEL_ID = process.env.AWS_BEDROCK_MODEL_ID! || "meta.llama3-3-70b-instruct-v1:0";
14
15export async function POST(req: NextRequest) {
16  try {
17    const body = await req.json();
18    const userInput: string = body.userInput;
19    const maxTokens: number = body.maxTokens || 300;
20
21    // Step 1: Retrieve context
22    const retrieveCommand = new RetrieveCommand({
23      knowledgeBaseId: KNOWLEDGE_BASE_ID,
24      retrievalQuery: {
25        text: userInput,
26      },
27    });
28    const retrievalResponse = await bedrockAgentRuntimeClient.send(retrieveCommand);
29    const retrievalResults = retrievalResponse.retrievalResults || [];
30    const retrievedDocuments = retrievalResults
31      .map(result => {
32        if (typeof result.content === "string") return result.content;
33        if (typeof result.content === "object") return JSON.stringify(result.content); // fallback for structured content
34        return "";
35      })
36      .join("\n");
37
38    // Step 2: Construct Model Payload
39    const modelFamily = process.env.AWS_BEDROCK_MODEL_FAMILY!;
40    const payload = buildPayloadForModel({
41      modelFamily,
42      userInput,
43      context: retrievedDocuments,
44      maxTokens,
45    });
46
47    // Step 3: Invoke model
48    const invokeCommand = new InvokeModelCommand({
49      modelId: MODEL_ID,
50      contentType: jsonContentType,
51      accept: jsonContentType,
52      body: JSON.stringify(payload),
53    });
54
55    const modelResponse = await bedrockRuntimeClient.send(invokeCommand);
56    const modelOutput = JSON.parse(new TextDecoder().decode(modelResponse.body));
57
58    return NextResponse.json({ response: modelOutput });
59    // return NextResponse.json({ response: {"generation": userInput} });
60  } catch (error) {
61    console.error("Internal Error:", error);
62    return NextResponse.json({ error: "Internal Server Error", details: error }, { status: 500 });
63  }
64}
Supporting Utility: buildPayloadForModel.ts
1type BuildPayloadProps = {
2 modelFamily: string;
3 userInput: string;
4 context: string;
5 maxTokens: number;
6};
7
8export const promptText = (retrievedDocuments, userInput) => {
9 return `You are an intelligent portfolio assistant for Rahul, helping users learn about Rahul's background, experience, and projects.
10
11 Answer the following user question in a helpful, concise and structured response in professional tone. Avoid phrases like "based on the provided context." If helpful, mention specific skills, tools, or projects from the context. If the question is general (e.g., "Tell me about yourself"), summarize key highlights in a well-organized format.
12
13 When answering questions, use clean text. Do not include Markdown for images, links, or badges like ""
14
15 Always format the output using markdown-style elements like:
16 - bullet points
17 - bold headings
18 - numbered lists (if appropriate)
19 - short paragraphs for clarity
20
21 Strictly use only the context provided. Do not make up any information without any facts. If context is missing, say: "Sorry, I don't have enough information to answer that."
22
23 Context:
24 ${retrievedDocuments}
25
26 User Question:
27 ${userInput}
28
29 Response:`
30}
31
32export const buildPayloadForModel = ({
33 modelFamily,
34 userInput,
35 context,
36 maxTokens,
37}: BuildPayloadProps) => {
38 switch (modelFamily) {
39 case "llama":
40 return {
41 prompt: promptText(context, userInput),
42 max_gen_len: maxTokens,
43 temperature: 0.5,
44 top_p: 0.9,
45 };
46
47 default:
48 throw new Error(`Unsupported model family: ${modelFamily}`);
49 }
50}Optional: Rate Limit Middleware (src/middleware.ts)
To avoid unnecessary LLM charges or abuse
1import { NextResponse } from 'next/server';
2import type { NextRequest } from 'next/server';
3
4const RATE_LIMIT = 5; // requests
5const INTERVAL = 60 * 1000; // 1 minute
6const tokenBuckets: Map<string, { tokens: number; last: number }> = new Map();
7
8export function middleware(request: NextRequest) {
9  const ip = request.headers.get("x-forwarded-for") || "unknown";
10
11  const now = Date.now();
12  const bucket = tokenBuckets.get(ip) || { tokens: RATE_LIMIT, last: now };
13
14  const elapsed = now - bucket.last;
15  bucket.tokens += elapsed * (RATE_LIMIT / INTERVAL);
16  bucket.tokens = Math.min(bucket.tokens, RATE_LIMIT);
17  bucket.last = now;
18
19  if (bucket.tokens >= 1) {
20    bucket.tokens -= 1;
21    tokenBuckets.set(ip, bucket);
22    return NextResponse.next();
23  }
24
25  return new NextResponse(
26    JSON.stringify({ error: "Too many requests. Try again later." }),
27    {
28      status: 429,
29      headers: { "content-type": "application/json" },
30    }
31  );
32}
33
34export const config = {
35  matcher: ["/api/query-bedrock"], // Limit this route
36};
✅ Now we have a working server-side API that securely connects our chat frontend to Bedrock’s LLaMA model using our knowledge base as context.
Building the Chatbot UI in Next.js + Tailwind
Folder Structure
1/components/Chatbot/
2│
3├── Chatbot.tsx            # Main floating button + window
4├── ChatHeader.tsx         # Welcome banner
5├── ChatInput.tsx          # Input box + send
6├── ChatMessages.tsx       # Message rendering
7├── ChatToggleButton.tsx   # Floating button
8├── SuggestedQuestions.tsx # welcome prompts
Floating Toggle Button - ChatToggleButton.tsx
1"use client";
2import { BsChat } from "react-icons/bs";
3
4export default function ChatToggleButton ( { isOpen, setIsOpen }: { isOpen: boolean; setIsOpen: ( v: boolean ) => void } ) {
5 return (
6 <button
7 onClick={() => setIsOpen( !isOpen )}
8 className="group fixed bottom-6 right-6 bg-gray-700 text-white inline-flex items-center justify-center rounded-full shadow-lg z-50 transition-all duration-1000 ease-out p-4"
9 >
10 <BsChat className="h-6 w-6" />
11 <span className="absolute -top-1 -right-1 bg-red-500 text-white text-xs px-1.5 py-0.5 rounded-full shadow">
12 AI
13 </span>
14 </button>
15 );
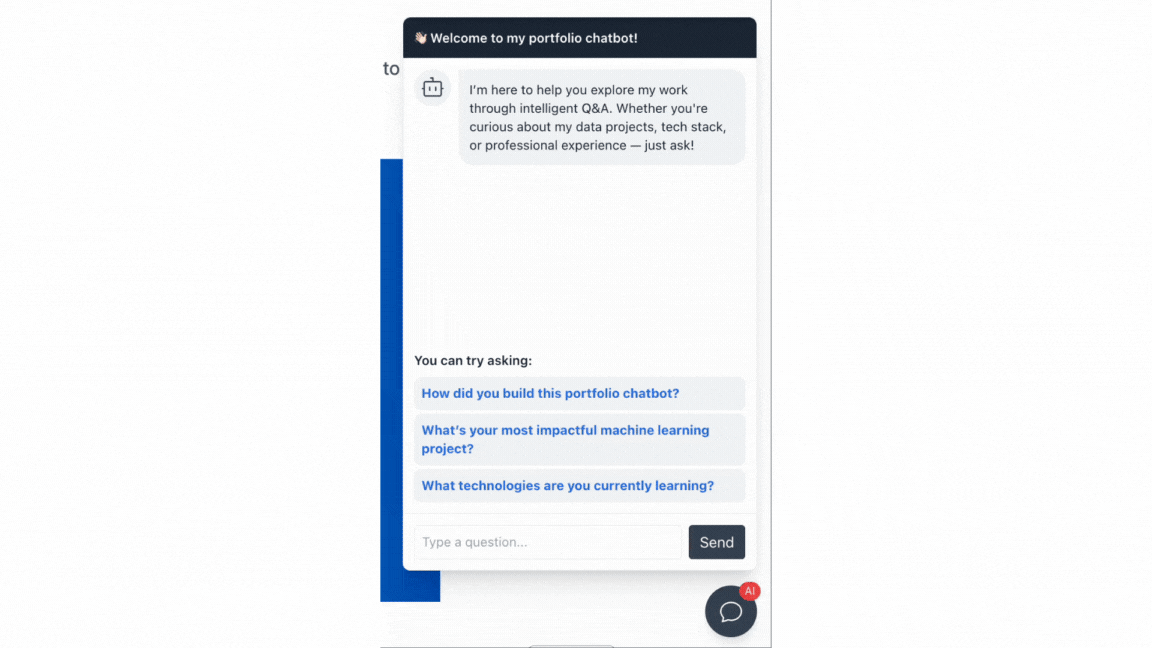
16}Header - ChatHeader.tsx
1export default function ChatHeader () {
2  return (
3    <div className="p-3 font-semibold bg-gray-800 text-white rounded-t-lg inline-flex items-center space-x-2">
4      <span className="text-sm">👋🏻 Welcome to my portfolio chatbot!</span>
5    </div>
6  );
7}
Renders user and assistant messages with avatars and typing animation - ChatMessages.tsx
1"use client";
2import { useEffect, useRef } from "react";
3import { GoDependabot } from "react-icons/go";
4import ReactMarkdown from "react-markdown";
5
6export default function ChatMessages ( {
7  messages,
8  isLoading
9}: {
10  messages: { role: string; content: string }[];
11  isLoading: boolean;
12} ) {
13  const scrollRef = useRef<HTMLDivElement | null>( null );
14
15  useEffect( () => {
16    scrollRef.current?.scrollIntoView( { behavior: "smooth" } );
17  }, [messages, isLoading] );
18
19  return (
20    <div className="flex-1 p-3 overflow-y-auto space-y-4 text-sm text-gray-800">
21      {messages.length === 0 ? (
22        <div className="flex items-start space-x-2 max-w-md text-sm text-gray-800">
23          <div className="bg-gray-100 p-2 rounded-full">
24            <GoDependabot className="h-6 w-6 text-gray-700" />
25          </div>
26          <div className="bg-gray-100 p-3 rounded-2xl rounded-tl-none">
27            I’m here to help you explore my work through intelligent Q&A. Whether you're curious about my data projects, tech stack, or professional experience — just ask!
28          </div>
29        </div>
30      ) : (
31        <>
32          {messages.map( ( msg, i ) =>
33            msg.role === "user" ? (
34              <div
35                key={i}
36                className="p-3 rounded-2xl rounded-br-none text-sm max-w-xs break-words w-fit bg-blue-500 text-white self-end ml-auto"
37              >
38                {msg.content}
39              </div>
40            ) : (
41              <div
42                key={i}
43                className="flex items-start space-x-2 max-w-md text-sm text-gray-800 mr-auto"
44              >
45                <div className="bg-gray-100 p-2 rounded-full">
46                  <GoDependabot className="h-6 w-6 text-gray-700" />
47                </div>
48                <div className="bg-gray-100 p-3 rounded-2xl rounded-tl-none prose prose-sm text-left text-sm max-w-xs break-words w-fit">
49                  <ReactMarkdown
50                    children={msg.content}
51                    components={{
52                      img: () => null, // Remove image rendering
53                    }} />
54                </div>
55              </div>
56            )
57          )}
58
59          {isLoading && (
60            <div className="flex items-start space-x-2 max-w-md text-sm text-gray-800 mr-auto">
61              <div className="bg-gray-100 p-2 rounded-full">
62                <GoDependabot className="h-6 w-6 text-gray-700" />
63              </div>
64              <div className="bg-gray-100 p-3 rounded-2xl rounded-tl-none flex items-center space-x-1">
65                <span className="h-2 w-2 bg-gray-500 rounded-full animate-bounce [animation-delay:.1s]" />
66                <span className="h-2 w-2 bg-gray-500 rounded-full animate-bounce [animation-delay:.2s]" />
67                <span className="h-2 w-2 bg-gray-500 rounded-full animate-bounce [animation-delay:.3s]" />
68              </div>
69            </div>
70          )}
71          <div ref={scrollRef} />
72        </>
73      )}
74    </div>
75  );
76}
Styled input box with onEnter and send button - ChatInput.tsx
1export default function ChatInput ( {
2  input,
3  setInput,
4  sendMessage,
5}: {
6  input: string;
7  setInput: ( value: string ) => void;
8  sendMessage: () => void;
9} ) {
10  return (
11    <div className="p-3 border-t flex">
12      <input
13        type="text"
14        className="flex-1 border rounded p-2 text-sm focus:outline-none focus:ring-2 focus:ring-gray-700 text-gray-800"
15        placeholder="Type a question..."
16        value={input}
17        onChange={( e ) => setInput( e.target.value )}
18        onKeyDown={( e ) => e.key === "Enter" && sendMessage()}
19      />
20      <button
21        onClick={sendMessage}
22        className="ml-2 px-3 bg-gray-700 hover:bg-gray-900 text-white rounded"
23      >
24        Send
25      </button>
26    </div>
27  );
28}
SuggestedQuestions.tsx
1"use client";
2import { useMemo } from "react";
3
4const suggestedQuestions = [
5  // Simple, welcoming starters
6  "Who are you?",
7  "What do you do?",
8  "What’s your background?",
9  "What are you currently working on?",
10
11  // Technical & project-oriented
12  "Tell me about your experience with data engineering.",
13  "What projects showcase your skills with AWS or cloud?",
14  "How did you build this portfolio chatbot?",
15  "Can you summarize your technical skills?",
16  "What’s your most impactful machine learning project?",
17  "Walk me through your ETL pipeline design.",
18  "What technologies are you currently learning?",
19];
20
21export default function SuggestedQuestions ( {
22  onSelect,
23}: {
24  onSelect: ( question: string ) => void;
25} ) {
26  const randomQuestions = useMemo( () => {
27    return suggestedQuestions.sort( () => 0.5 - Math.random() ).slice( 0, 3 );
28  }, [] );
29
30  return (
31    <div className="p-3 text-sm text-gray-800">
32      <div className="mb-2 font-semibold">You can try asking:</div>
33      <ul className="space-y-1">
34        {randomQuestions.map( ( q, idx ) => (
35          <li
36            key={idx}
37            className="cursor-pointer bg-gray-100 p-2 rounded-lg text-blue-600 text-sm font-bold hover:underline"
38            onClick={() => onSelect( q )}
39          >
40            {q}
41          </li>
42        ) )}
43      </ul>
44    </div>
45  );
46}
Chatbot Shell with Framer Motion - Chatbot.tsx
1"use client";
2import { useEffect, useState } from "react";
3import ChatToggleButton from "./ChatToggleButton";
4import ChatHeader from "./ChatHeader";
5import ChatMessages from "./ChatMessages";
6import ChatInput from "./ChatInput";
7import { MdAutoDelete } from "react-icons/md";
8import SuggestedQuestions from "./SuggestedQuestions";
9
10import { motion, AnimatePresence } from "framer-motion";
11
12
13export default function Chatbot () {
14  const [isOpen, setIsOpen] = useState( false );
15  const [messages, setMessages] = useState<{ role: string; content: string }[]>( [] );
16  const [input, setInput] = useState( "" );
17  const [isLoading, setIsLoading] = useState( false );
18
19  // Send messages
20  const sendMessage = async ( customInput?: string ) => {
21    const question = typeof customInput === "string" ? customInput : input;
22    if ( !question.trim() ) return;
23
24    const newMessages = [...messages, { role: "user", content: question }];
25    setMessages( newMessages );
26    setInput( "" );
27    setIsLoading( true );
28
29    try {
30      const res = await fetch( "/api/query-bedrock", {
31        method: "POST",
32        headers: { "Content-Type": "application/json" },
33        body: JSON.stringify( { userInput: question } ),
34      } );
35
36      console.log( `Response from API`, res )
37
38      if ( res.status == 429 ) {
39        // Rate limit exceeded
40        setMessages( [
41          ...newMessages,
42          {
43            role: "assistant",
44            content: "⚠️ You’ve hit the rate limit. Please try again in 60 seconds.",
45          },
46        ] );
47        return;
48      }
49
50      if ( !res.ok ) throw new Error( "Unexpected server error" );
51
52      const data = await res.json();
53      const aiReply = data.response?.generation || "Sorry, I couldn't generate a response.";
54      setMessages( [...newMessages, { role: "assistant", content: aiReply }] );
55    } catch ( error ) {
56      setMessages( [
57        ...newMessages,
58        { role: "assistant", content: "⚠️ Something went wrong. Please try again." },
59      ] );
60    } finally {
61      setIsLoading( false );
62    }
63  };
64
65  // Clear messages from use-state and local storage
66  const clearMessages = () => {
67    setMessages( [] )
68    localStorage.setItem( "chatbot-messages", JSON.stringify( [] ) );
69
70  }
71
72  // Load messages from local storage
73  useEffect( () => {
74    const storedMessages = localStorage.getItem( "chatbot-messages" );
75    if ( storedMessages ) {
76      setMessages( JSON.parse( storedMessages ) );
77    }
78  }, [] );
79
80  // Update messages in local storage
81  useEffect( () => {
82    localStorage.setItem( "chatbot-messages", JSON.stringify( messages ) );
83  }, [messages] );
84
85
86  return (
87    <>
88      <ChatToggleButton isOpen={isOpen} setIsOpen={setIsOpen} />
89      <AnimatePresence>
90        {isOpen && (
91          <motion.div
92            initial={{ opacity: 0, y: 50 }}
93            animate={{ opacity: 1, y: 0 }}
94            exit={{ opacity: 0, y: 50 }}
95            transition={{ duration: 0.3 }}
96            className="fixed bottom-24 right-6 w-96 h-[600px] bg-white border rounded-lg shadow-xl flex flex-col z-50 overflow-x-hidden break-words max-w-full">
97            <ChatHeader />
98            <ChatMessages messages={messages} isLoading={isLoading} />
99            {messages.length === 0 && !isLoading ? (
100              <SuggestedQuestions onSelect={sendMessage} />
101            ) : <button
102              onClick={clearMessages}
103              className="text-xs text-gray-600 hover:text-red-500 self-center mt-1 p-1 bg-gray-100 w-full font-semibold inline-flex justify-center items-center space-x-2"
104            >
105              <MdAutoDelete className="h-4 w-4" />
106              Clear chat history
107            </button>}
108            <ChatInput input={input} setInput={setInput} sendMessage={sendMessage} />
109          </motion.div>
110        )}
111      </AnimatePresence>
112    </>
113  );
114}
Call the Chatbot.tsx component inside the layout.tsx file to show it on all pages.
Root Layout File - layout.tsx
1export default async function RootLayout ( {
2  children,
3}: Readonly<{
4  children: React.ReactNode;
5}> ) {
6  return (
7    <html lang="en" className='hide-scrollbar min-h-screen'>
8      <body
9        className={`${ fontHeading.variable } ${ fontBody.variable } antialiased`}
10      >
11        <>
12          {children}
13          <Chatbot />
14        </>
15      </body>
16    </html>
17  );
18}
✅ Result
You now have:
- Floating chat button visible on all pages
- Animated chatbot panel (Framer Motion)
- Tailwind-powered UX
- Reusable components
- Support for suggested questions, input, loading indicator
Deployment & Environment Setup on Vercel
To make your chatbot accessible on the web, you need to deploy your Next.js app (with App Router) to Vercel and securely configure your AWS Bedrock environment.
We’ll cover:
- ✅ Setting up your repo for deployment
- 🔐 Adding .env secrets on Vercel
- 🧪 Testing after deployment
✅ 1. Prepare for Deployment
Push the code to Github repo
1git init
2git remote add origin https://github.com/yourusername/portfolio-chatbot
3git push -u origin main
Then connect this repo to Vercel via the dashboard: https://vercel.com/new
🔐 2. Add Environment Variables to Vercel
Go to your project on Vercel Dashboard, and add the following under Settings > Environment Variables:
- AWS_REGION: us-east-2 (or your Bedrock region)
- AWS_ACCESS_KEY_ID: (your IAM user key)
- AWS_SECRET_ACCESS_KEY: (your IAM user secret)
- AWS_BEDROCK_KNOWLEDGE_BASE_ID: from Bedrock console
- AWS_BEDROCK_MODEL_ID: meta.llama3-3-70b-instruct-v1:0
- AWS_BEDROCK_MODEL_FAMILY: llama
💡 Note: us-east-2 support wide variety of options compared to other regions
🧪 3. Test in Production
Once deployed:
- Go to https://your-vercel-domain.com
- Open the chatbot- Ask something like “Tell me about your certifications” or “What’s your tech stack?”
✅ You should see your chatbot retrieve info from your resume and markdown files — formatted neatly.
🎉 That’s it! Your chatbot is now:
- Hosted ✅
- Secure ✅
- Powered by LLaMA + RAG ✅
- Accessible across your portfolio ✅
Chatbot Demo
What I Learned From This Project
This project was so much more than adding a chatbot to my website. It pushed me to connect multiple domains:
- I deepened my understanding of LLM architectures, especially how Retrieval-Augmented Generation (RAG) can make models context-aware.
- I got hands-on with Amazon Bedrock, exploring both the strengths and quirks of working with hosted models like LLaMA 3.3 and embedding engines like Titan V2.
- I refined my skills in building scalable API routes in Next.js, using modern patterns (App Router, server actions), while making the UI smooth with Tailwind and Framer Motion.
- I also explored rate limiting, vector stores, and ways to optimize for both user experience and cost — lessons that are incredibly practical for real-world AI apps.
- But most importantly, I learned how to transform a static portfolio into an intelligent experience — one that can answer questions, guide conversations, and evolve over time.
Why This Project Was Valuable
- ✅ It made me think like an architect, balancing infrastructure, UX, and ML
- ✅ It forced me to document everything clearly, since it wasn’t just for me
Building this chatbot helped me level up in AI, MLOps, and full-stack engineering — and the best part? It’s real, it’s live, and it works.